


If you read our blog post on Our Favorite Lightroom Preset and left feeling a little disappointed, then we wanted to make that up to you today. Although we still aren’t sharing any preset information, (mainly since we don’t use them, because if we did, we love you enough to share) we DO want to share with you two things we do to every single photo we bring into Lightroom. In a sense, we have set these as a preset. We created an import setting that applied these two corrections to every photo.
Remove Chromatic Aberrations
If you have no idea what a chromatic aberration is, you’re not alone. We’ll calm your nerves right away though – it’s not a contagious disease. And if it was, we don’t have it. Which means we really wouldn’t need to remove them anyways. Which would make this point irrelevant.
Chromatic aberration is a big fancy word that refers to sections of discoloring cause by a lenses’ inability to completely focus all colors in some cases.
Meriam Webster defines it like this: the material effect produced by the refraction of different wavelengths of electromagnetic radiation through slightly different angles, resulting in a failure to focus. It causes colored fringes in the images produced by uncorrected lenses.
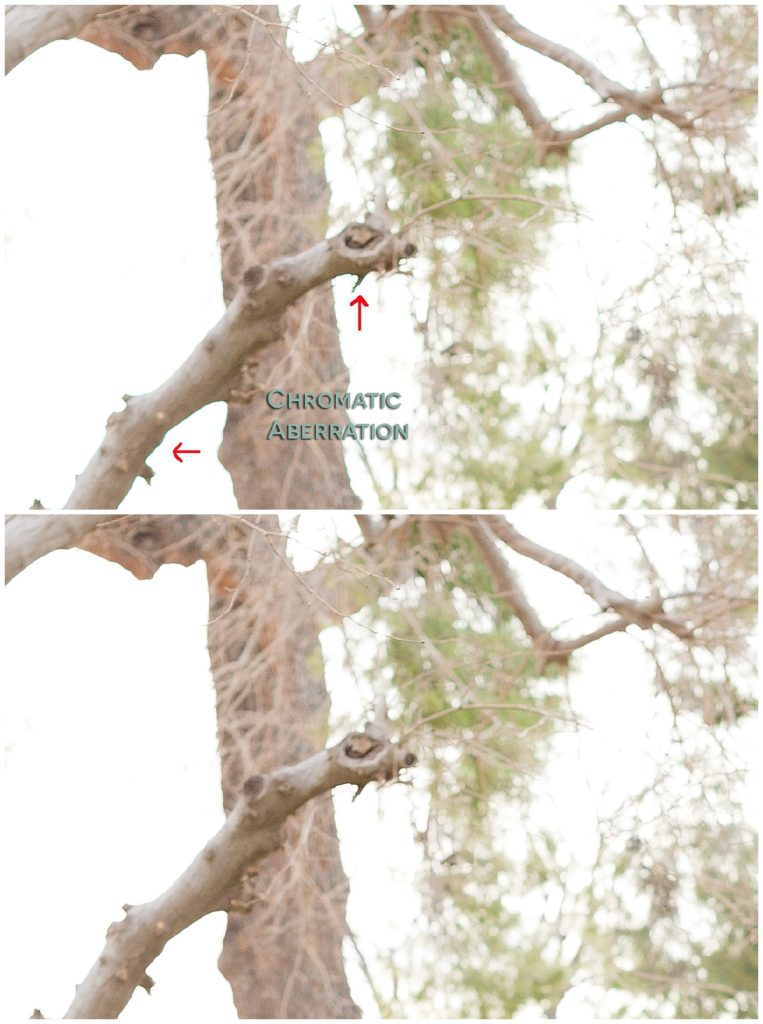
Since Meriam is the only one who understands what that means, we thought we would break it down a little further for you. Have you ever taken a photo that had an object like a tree with no leaves, only to notice that the branches seemed to have a purpley/pinkish or green edge to them? That ugly color cast is the effect of Chromatic Aberration. So while understanding the exact reasons why the camera struggles with certain wavelengths isn’t super important, knowing how to get rid of the fringe color is!
Lightroom makes it simple. In the Develop module, simply scroll down the right toolbar to ‘Lens Corrections’ and check the box next to ‘Remove Chromatic Aberration.’ Lightroom is smart enough to do the heavy lifting, and typically does a great job cleaning any chromatic aberration up on it’s own!
Take a look at the example below, with the super-zoomed in images on the tree branch. The first image has no chromatic aberration correction. We’ve drawn arrows to point out the fuzzy green fringes around the branches. The second image has the corrections applied! The difference may be small, but corrections like these are what elevate photos, and it’s so easy to do!
Lens Profile Corrections
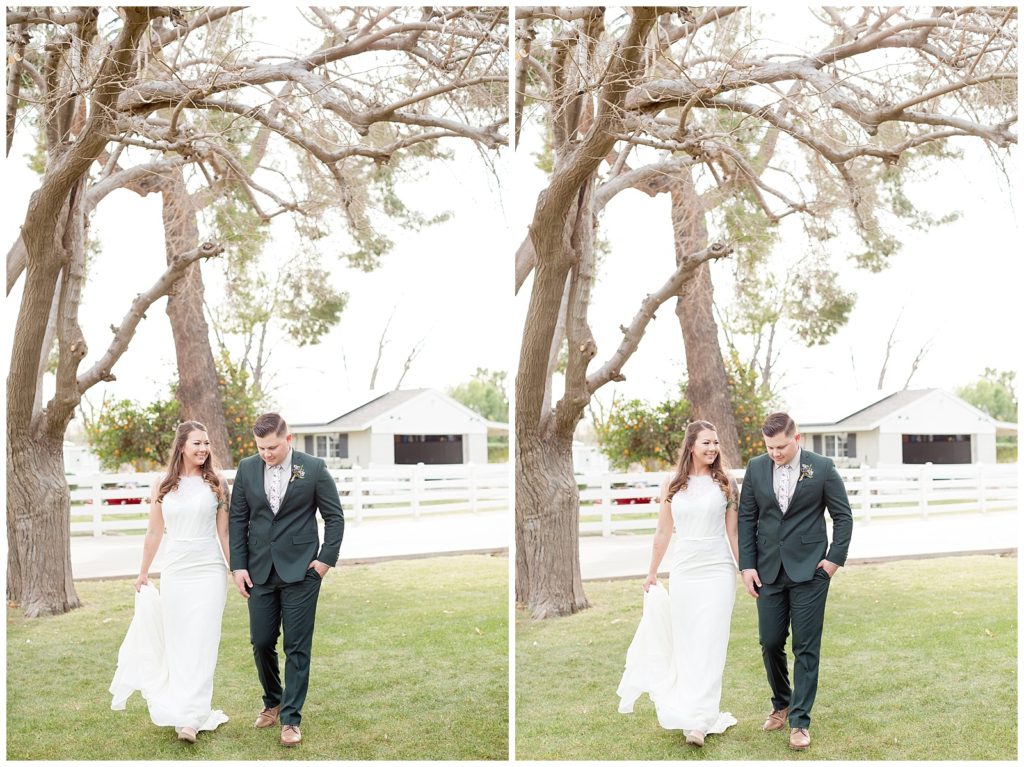
The other thing we do to every photo involves lens profile corrections. Basically, every lens creates some sort of image distortion. Whether that is a convex bubble looking feel to the center of the photo, or edges that lean in on a wide angle lens, most lenses have some sort of natural distortion. In addition to distortion, most lenses will cast a vignette around the edges of the photo frame. While some photographers prefer and even trademark themselves with a certain vignette, we prefer the image to flow out to the edges without any color change. Since lenses naturally produce the darkening color around the edges, it has to be corrected.
This is also a super simple fix thanks to Lightroom! Just beneath the ‘Remove Chromatic Aberration’ check box is the ‘Enable Lens Profile Corrections’ checkbox. Simply check the box and in most cases (especially when shooting in RAW) the image file should have the lens information automatically populate. In cases where it does not, use the drop down menus to select the manufacture and lens you shot the image with, and it will apply the corrections for that lens!
Take a look at the photos below. On the left is the image without lens profile corrections. While the lens distortion correction is hard to see by comparing the two (there was very little correction needed with the 50mm f/1.2) the vignette correction is much easier to spot! Look at the corners of the image on the left compared to the image on the right, which has the corrections applied.
Again, since we apply these corrections to every single image, we set up an import preset that automatically applies those settings to each photo as they are imported into Lightroom! It speeds up our workflow, and ensures that we never miss it on an image.
We hope this is helpful for you, friend!

Comments +